Showing posts with label Repair. Show all posts

Saturday, May 25, 2024

Replacing the Bottom Bracket on my Budget Bike from Amazon

This is my Vilano hybrid bike. I ordered it off Amazon 7 years ago and outfitted it with some fenders and a cargo rack. The total cost for the bike and accessories was just under $300, so you know this is a cheap bike. For the price, it has been fairly reliable. Aside from quick trips to/from the gym and back, I have taken it on distances as far as 15 – 20 miles. Regarding repairs, I've had to replace a few broken spokes in the past, which wasn't too difficult; I had to learn how to do those repairs myself. The reasons here being:

1) the bike is cheap, repair costs from a shop would exceed the cost of a replacement bike of this style

2) when I brought the wheel to a bike shop for advice, they essentially told me to toss the bike and get a better one.

Now 7 years later the bike has developed a new problem. When I'd pedal, there would be a subtle 'thunk' in the crank area every revolution. Researching the problem online said the bottom bracket bearings were failing.

Tuesday, September 14, 2021

American to European Bottom Bracket Adapters Aren't as Turnkey as I hoped! - Bicycle Crank Upgrade

When I bought my Huffy Rock Trail bike at a rummage sale few years ago, I admired it for having a one-piece crank.  Metallurgically speaking, I thought it was really cool to have the entire crank made from one forged piece of steel opposed to three separate pieces screwed together.  The reality is, this style of crank is inferior to the cartridge style bottom brackets that come standard on most modern bikes of adequate quality.  I wasn't convinced until recently when the bearing assembly started failing on me, and then kept failing after I repaired it 3 times in less than 2 years.

The first time it failed, one of the bearing cups cracked, resulting in a total seizing of the crank, as the bearings got lost inside the bottom bracket shell, and the crank went off axis.

Friday, April 30, 2021

Turntable Final Assembly

Now that all the main components of the turntable are done, let's put it together!  I had a few hangups in assembly because, well, my blueprints were a bunch of scrap pieces of paper in a folder collected over the course of 3-4 years, and stuff didn't line up.  Anyways, in no particular order, here it is.

First, I needed the driving belt.  I bought two of these because I was originally planning to make two turntables (though after realizing how much hard work it was, I'm settling for one).  This was a standard 3/8" V-belt and, as noted on the label, they are 38" long.  These belts were actually too wide for the pulley that came stocked on the motors, but I couldn't find anything smaller.

Next, the plug outlet box.  As much as I love my Technics 1200s, the one feature they don't have is removable RCA and power cables.  This was one feature I missed about my first cheap set of Stanton turntables, so I decided to replicate it.  This box was to be made from some aluminum sheet metal.  The piece was actually left over from my old bike basket mount, which explains the unnecessary preexisting holes.  I drilled new holes for the connectors, mounting holes, and rivets prior to bending.

Tuesday, November 24, 2020

Jigsaw Blade Clamp Repair (U-Shank to T-Shank Conversion)

Jigsaw blades are available in two major styles: U-shank and T-shank.  Unfortunately, I was unaware of this fact when I bought my first jigsaw at a garage sale for $5.  I mistakenly bought a package of T-shank blades for it when it really took U-shank.


Not wanting to admit that I wasted $12 on the wrong blades for a $5 jigsaw, I decided to use them anyways because the package said, "Fits all jigsaws".  The blades did not fit properly and would slip out during use.  I still insisted they were supposed to work, so I tightened the blade clamp harder... too hard it seemed, since I'd cracked it right down the middle.

Friday, November 13, 2020

Small Mill, Big Vise

When I won my $500 All Industrial Supply shopping spree at the Bar-Z Summer Bash in 2018, my first inclination was to buy a Kurt vise for my machine.  However, after looking at the dimensions, it seemed that even the smallest vise was still too big for my tiny machine table.  The bolt locations would not have lined up with the T-slots, and I would've had to make a fixture plate to mount it.  Even then, there might've been an issue with the vise handle interfering with my machine's Y-axis handwheel.  Not wanting to risk all this confusion, I remembered that my friend had won several vises at an auction which he wasn't using.  He was kind enough to let me have the one of my choice.

I ended up spending the $500 on other things.

The vise I chose was this large two-piece one, shown here next to a standard mill vise for comparison.  The thing I liked about this one, aside from virtually unlimited holding capacity, was the height of the jaws. By itself, the back jaw practically doubles as an angle plate!

Tuesday, March 3, 2020

Crown Victoria Blend Door Actuator Replacement

This part is one of the biggest pains in the ass to replace. But the job is worth undertaking for what you regain.
A common problem on Fords is the failure of the Blend Door Actuator. This motor controls the position of the air door in the plenum which affects the temperature of the air blown into the cabin. If the blend door actuator fails, you are no longer able to control the temperature with your climate control unit any more. Symptoms include AC stuck on cold, AC stuck on heat, and/or an annoying clicking noise from underneath the dashboard.

Tuesday, February 25, 2020

Crown Victoria Tailpipe Hanger Replacement

Time for another car repair DIY guide for my 2005 Crown Victoria.
I had taken my car to an exhaust shop for what I thought was an exhaust leak. Instead I given a diagnosis for an unrelated issue. The tailpipe was hanging pretty loose. I guess I noticed the symptoms but I had no idea this was the cause of it until I fixed it.

Monday, December 9, 2019

Smoothie Repair - Fixing My 40 Year Old Waring Blender

I've been working my "vintage" Waring 11-298 blender hard for the past 3 years since I received it at a garage sale for free (I refused to make an offer, and the lady just said I could have it).
However, one day I was blending a smoothie and the blade assembly came loose from the base of the pitcher.  I noticed some unusual vibration, the blending action was not working like it should, and on top of that, the contents started leaking out the bottom.  It was time to give this blender some maintenance.
Waring 11-298 blender 7
First, using all the socket extensions available, I unscrewed the blade.  Then, not pictured, unscrewing the bushing assembly with pliers.
unscrewing blade Waring 11-298

Thursday, December 5, 2019

The Computer Lab - Final Curtain Rod

When I built my loft bed, I placed it next to the window to have convenient natural lighting in the computer lab.  However, sometimes the light is overbearing and causes glare on my computer screen.  I wanted to have the option to block this out.
Where we last left off, I had completed the side curtains for the door.  I still had another set of curtains remaining, so it was time to build another curtain rod!
loft bed computer lab window lighting placement
I found these eyelets at a garage sale.  The ones with the plastic inserts were in a package marked as "TV cable hangers".  I decided to use these, taking advantage of the plastic inserts to make my screw clearance tighter as illustrated below.
eyelet screws tv cable hangers

Sunday, August 18, 2019

Bicycle Collision Repair

bicycle collision repair before and after
Oh no! My bike got smashed in a car crash.  I've never had this happen in 10 years of biking, and I didn't really know how to handle the whole situation.  What happened?  Well, check the poorly drawn diagram below. (not so poorly drawn, because one of those helped me win back $360 from the police in a court case once!)
bicycle basket and wheel after car crash
I was cruising down the street at night, and somebody stopped at a stop sign ahead of me "didn't see me" (a pretty reasonable claim considering the ENTIRE ROW OF STREET LIGHTS that stretch of street happened to be off, though I still had my Niterider light on, so not a good enough excuse) and started turning left as I was within feet of passing in front of him.  As a result, I smashed into his left mirror completely destroying it, and was sent spiraling leftward into the street and- fortunately there was no traffic behind me- landing on my side with minor injuries to my ribs and foot. 
How did it feel?  It felt like I just got off a really good roller coaster.  Literally.  I walked away laughing.  I know things could've been worse, had I not been wearing a helmet, or if I was hit directly by the front of the car, or if there were traffic behind me to run me over, but I am thankful it wasn't that serious.
I wasn't really in the mood to call the police, I was in a bit of a hurry to get home to eat some cashews and figs after partying at the 80's bar (no I wasn't drinking), and didn't want to make things complicated.  The guy gave me $100 of hush money to "buy a new bike" and gave me a ride home.  Fortunately, I only needed $4 of those dollars to buy a new wheel from The Bicycle Tree (the tire and tube were completely unharmed).  At first I was panicking about needing a new fork, but it turned out to be undamaged as well.  Thank goodness for the shock absorbing power of steel rims!
bike hitting car diagram

Thursday, March 21, 2019

Repairing The Tray

One of my favorite early projects on this website was the tray.  Though simple, it has proved to be very useful.
Check out the original tray post here
However, after 6 years of long and hard use as a dish rack, the wood panel started getting moldy.  Nasty!  Time to upgrade to metal!

Monday, March 11, 2019

The Brake Job from Hell featuring @vinnysvic

Today we are going to feature something a bit different.
My car, a 2005 Crown Victoria was due for a brake job. When braking, I would experience some vibration coming through the brake pedal upon being compressed. It wasn't a serious issue, but it had to be fixed eventually. In the past, I had done a brake job on my other car so this was not going to be my first rodeo. I had been procrastinating on doing this task for a while, but after helping out a friend with his car earlier in the same day, I decided to stop by AutoZone to rent a torque wrench to get the job done. I figure it was a good day to do the front pads and rotors and thought it shouldn't take too long, right?


Saturday, February 17, 2018

Kitchen Knife Handle

A while back I found this kitchen knife in the street that was missing a handle.  It seemed in good condition, so I decided to fashion a new handle.  I used this handle I was given from a broken brass hammer.

Monday, January 22, 2018

Bicycle Stem Repair 3

Previously on Scrap Attack:
We built this stem upgrade which cracked after 9 months of use
Building the stem upgrade
Then, repaired it with a second tube
Repairing stem upgrade the first time
And now:

Wednesday, October 18, 2017

Bicycle Stereo Rebuild

Part 1 - First Build
Part 2 - Sirius Stereo

Where we last left the original bike stereo, the top part had snapped off.
bike stereo broken
I'd realized the Sirius stereo still wasn't loud enough (and kind of awkward to fit on the bike), so I decided to finally add those angle brackets.
fixing old bike stereo design with angle brackets
One problem... the original stereo didn't exactly fit into my new larger basket, so it's time for a rebuild.  The good news is that the new basket will allow for a more compact design with the speakers right next to each other- therefore, more stable and louder as well.
old bike stereo configuration not fitting in new basket

Sunday, August 13, 2017

Taking Apart a Refrigerator Compressor

One day I was watching a Huell Howser episode on refrigerator recycling.  I was curious about the compressor part for two reasons; 1. I was considering building another bicycle powered compressor for a full fledged bicycle foundry vegetable oil burner, and 2. I'd read during a research project that they use permanent magnet brushless motors in applications like this and wanted to build a generator with them (also bicycle powered of course). 
Immediately after watching the episode, I went for a walk and conveniently, found a refrigerator next to the dumpster.  I jumped at this amazingly obvious scrap alchemy opportunity.  I noticed somebody else had already cut the copper pipes that would contain the freon, so I was already exempt from having to deal with that issue.  I went out with some tools and within a matter of 10 minutes had taken off the compressor and also the cooling fan.
Let's take it apart!

Thursday, March 30, 2017

Bicycle Basket Modifications

My welding teacher would always joke that if welding was too difficult for you, you could always quit and go into basket weaving or something.  What he failed to mention was that basket weaving is actually more difficult than welding!
I had been looking for some larger baskets for my bikes, but they don't seem to come in convenient sizes or shapes (at garage sales at least), so I figured I'd try experimenting with buying some oversized ones and cutting them down to size.
I found this first basket, presumably designed to hold vinyl records, which I wanted to put on the front of my bike from the Bicycle Upgrayedd 2 project.  Clearly, I don't want my stuff falling out the side of the basket when I'm riding, so I'll have to modify the shape a bit.

Thursday, January 26, 2017

DIY Bike Pedals

Back in high school, my 2nd most ambitious project (the first being the foundry of course) was to make my own bike pedals from scratch.  I had used and broken some pathetic plastic pedals in my time, and decided enough was enough.  It was a great project because I got to learn how to use a lot of equipment usually unavailable to the rest of the class including a CNC lathe, mill, and waterjet cutter.  This was also when I learned how to do lathe threading, so I could cut those 9/16"-20 LH & RH threads for where the axles thread into the crank. 
custom made ice cream sandwich bike pedals
I had a visionary idea to start a business selling bike pedals that look like ice cream sandwiches.
One of the problems with the pedals was the fact that I had opted to use plastic bushings instead of ball bearings, and I had no concept at the time of what a tolerance was.  The bushing idea came from watching an episode of Edge Factor about a bike pedal company in Canada that used them. Furthermore, I had never used a CNC lathe before and I actually was the first one in the history of the school to learn how to use it (even before the instructors!).  What I ended up producing were axles that were several thousanths larger than the specified tolerance range provided with the bushings which caused them to wear prematurely.  I remember spending considerable time at the belt sander grinding them down just so they would fit.  If I had known how to use a micrometer, I could've inspected the axles while still in the lathe and readjusted the tool offset so I could hit the correct dimension.
custom pedals without diamond plate
Image from the failed pedal straps post
On top of that, I couldn't find the metal supply store that stocked 3/4" chromoly round stock, so I was forced to make the axles out of whatever was lying around.... bad move.
In the case of the pedals that went on my main bike, one of the pedals had an axle made of cold rolled 1018, and the other one was hot rolled.  Guess which one broke first?  Yes, the hot rolled one, since hot rolled is weaker due to its larger grain structure, making it softer and more flexible.  Notice the breaking pattern on the cross section, it's clear that the axle had been cracked part of the way through for a while before it finally broke off.  This happened after 5 or so months of use.  I had actually machined a new axle to replace the broken one, but over time, I just abandoned the whole project altogether.  I knew without the proper steel and heat treatment, this would eventually happen again.
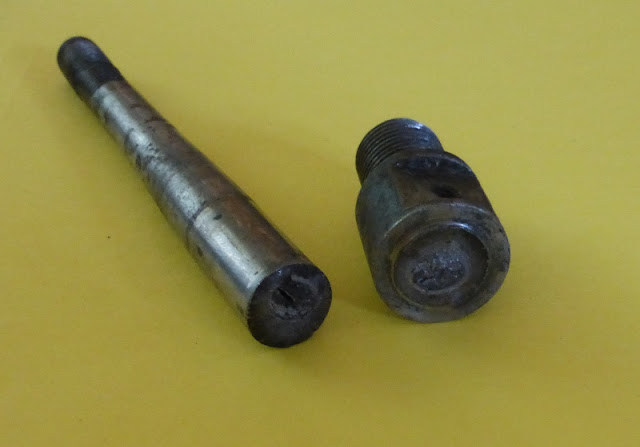
broken bike pedal axle
Fast forward a few years later: I bought some more pedals at a garage sale with hopes of rekindling my interest in toe straps.  These pedals looked really nice with the leather straps, metal clips, and everything, but for some unknown reason, the designers thought it would be a good idea to hold it all together with a PLASTIC pedal body!!!!  Now, you don't have to be The Mike Tyson of Engineering to know that plastic threads strip far easier than metal ones (take the waffle iron project for instance).  I didn't want to waste this perfectly good opportunity throwing out pedals with so many useful parts in tact, so I decided to take the initiative and give pedal building another chance... except this time I would already have a decent axle/ bearing set to work with, so I wouldn't suffer the same fate as before.
bike pedals with cheap plastic bodies

Thursday, January 19, 2017

Fraudulent Vise Grip Repair

These fraudulent vise grips appeared in a convenient scrap bin one day, so I took them.  I can always tell them apart since the real ones only have one rivet instead of three next to the upper jaw.  The reason they were scrapped appeared to be a crack on the lower jaw.
So I just welded it.  Of course, it might crack again, but there's always a situation where some semi-lousy vise grips can come in handy.
I used to confuse "vanadium" with "vandalism"

Thursday, January 5, 2017

Waffle Iron Repair

We had this waffle iron that broke, so I tried to fix it.
broken waffle iron
It seemed that the people who designed this thing thought it would be a good idea to thread the screws into plastic bosses, which over time melted enough to compromise the threads.
waffle iron plastic screw bosses