Showing posts with label Knuth DBF400. Show all posts

Friday, April 30, 2021

Turntable Final Assembly

Now that all the main components of the turntable are done, let's put it together!  I had a few hangups in assembly because, well, my blueprints were a bunch of scrap pieces of paper in a folder collected over the course of 3-4 years, and stuff didn't line up.  Anyways, in no particular order, here it is.

First, I needed the driving belt.  I bought two of these because I was originally planning to make two turntables (though after realizing how much hard work it was, I'm settling for one).  This was a standard 3/8" V-belt and, as noted on the label, they are 38" long.  These belts were actually too wide for the pulley that came stocked on the motors, but I couldn't find anything smaller.

Next, the plug outlet box.  As much as I love my Technics 1200s, the one feature they don't have is removable RCA and power cables.  This was one feature I missed about my first cheap set of Stanton turntables, so I decided to replicate it.  This box was to be made from some aluminum sheet metal.  The piece was actually left over from my old bike basket mount, which explains the unnecessary preexisting holes.  I drilled new holes for the connectors, mounting holes, and rivets prior to bending.

Tuesday, April 27, 2021

Turntable Headshell Connector

One of the biggest challenges in this turntable build was attempting to recreate the headshell connector.  This part allows for quick and easy interchangeability of needle cartridges between turntables.  Otherwise, I would have to unscrew and disconnect the cartridge cables every time I wanted to remove it.  Wanting this turntable to be compatible with my other ones, which accept standard headshells, I figured I had no choice but to make this connector.

The challenge here was the amount of small and complex parts needing to be made; a threaded locking mechanism, a slotted body, and insulated piece to house four spring-loaded brass contact pins, and the pins themselves.  Then on top of this, figuring out how it will connect to the tonearm and wiring it.

My version did a fair job replicating it, but it took a lot of hard work, several failed attempts and a few design flaws.  Part of the reason for my shortcomings was the fact that I didn't want to disassemble my Technics to see how it worked.  I just did the best I could from the measurements I could get on the outside.

Here's a diagram of my headshell connector.  The biggest difference between mine and the Technics is a snap ring holding on the locknut.  This is because my tonearm is a larger, and having to match this larger diameter on the connector, I couldn't slide the locknut on through the back.  On the Technics, the locknut is secured by a shoulder on front of the connector body.

Tuesday, April 20, 2021

Casting The Turntable Platter - Sweep Pattern Experiment

The next step for the turntable project was to make the platter.  This was the second of the two cast aluminum components to make, and unlike the Technics which is die cast, this too would be sand casted.  However, this time I chose a different molding method called "sweep casting" which is applicable to radially symmetric parts like this.  This was my first time trying this, and I had relatively favorable results.

The sweep pattern is basically a cross section of the part being casted, which is swept around a central axis to remove pre-rammed sand layer by layer.  Think of it like those center pivot irrigation systems, except instead of watering crops, we're removing sand to create a mold cavity.

This has the advantage of saving time since I didn't have to make an entire wooden replica of the turntable platter.  I began by transposing the final dimensions of the platter, plus shrinkage allowance, into a flat piece of plate.  Pardon the atrocious blueprints

Friday, November 13, 2020

Small Mill, Big Vise

When I won my $500 All Industrial Supply shopping spree at the Bar-Z Summer Bash in 2018, my first inclination was to buy a Kurt vise for my machine.  However, after looking at the dimensions, it seemed that even the smallest vise was still too big for my tiny machine table.  The bolt locations would not have lined up with the T-slots, and I would've had to make a fixture plate to mount it.  Even then, there might've been an issue with the vise handle interfering with my machine's Y-axis handwheel.  Not wanting to risk all this confusion, I remembered that my friend had won several vises at an auction which he wasn't using.  He was kind enough to let me have the one of my choice.

I ended up spending the $500 on other things.

The vise I chose was this large two-piece one, shown here next to a standard mill vise for comparison.  The thing I liked about this one, aside from virtually unlimited holding capacity, was the height of the jaws. By itself, the back jaw practically doubles as an angle plate!

Monday, November 18, 2019

Mounting a 4-Jaw Chuck On My Lathe (Video)

I had received a 4-Jaw chuck that was going to be scrapped a while ago, but suddenly became inspired to finally mount it on my lathe after watching this video.  Also the revelation that I actually had a right-angled screwdriver that could help me disassemble the original chuck mount made it possible.
I didn't really cover the process of building the adapter in the video so here are some more detailed photos:

I started with this scrap piece.  I had to use one of the lathes at school because mine couldn't hold this large of diameter.

Sunday, March 31, 2019

Completing The Computer Lab - Curtain Rod

The final structural addition to the loft bed computer lab was to add the curtains.  I had some curtains left over from my old apartment which my mom made for me, but unfortunately, we accidentally donated the curtain rods.  Thankfully, the Law of Scrap Alchemy saved the day when I found this extended mop/squeegee handle in the trash that happened to be the perfect length to span the entrance to the computer lab!

Sunday, December 2, 2018

Bicycle-Mounted Recording Studio | Bike Mic Stand

I was intending on making a mic stand to attach to my bike so I wouldn't need to carry around my full size one when doing outdoor recording.  I was originally thinking of some complicated c-clamp mechanism to attach to the seatpost, but then I remembered the light mount I made has a pretty generic rectangular attachment which I could take advantage of.
The new design utilizes a top half of a half mic stand I had lying around, and I made an extension rod from some 3/4" diameter aluminum.  Pretty simple design compared to what I had planned originally.

Wednesday, June 27, 2018

Bike Light Mount 2

The light mount I made 2 years ago for my main bike has been working remarkably well.  The only problem is that my other bike, the San Antonio Smuggler has been seeing less use due to the the inability to mount my Niterider light on it.  I had been using the 1990s incandescent Cateye light on it, but it hasn't been doing much justice for illuminating the road ahead.  Time to build another mount for the Niterider.
I intended to make an exact replica of the first one.  The problem was I didn't have any blocks of aluminum big enough to match the original dimensions.
The solution was to modify the design to utilize 2 smaller pieces, and have it clamp on the handlebars sideways instead of vertically.  Genius! now it even has the added benefit of weight savings since all that material in the middle is missing.  The catch was I had to machine 2 spacers to go between the blocks while machining (bottom right corner of above picture).

Thursday, June 21, 2018

Big Bicycle Bell Ringer

I had always fantasized about putting a train bell on my bike, but since those things are made of cast iron, it would be an unnecessarily heavy addition to my bike (like, even more heavy than the stuff I already put on).  I decided to settle for second best when I found this bell at a garage sale that looks like it goes on a boat.
Ring my bell!
I began work designing a new ringer that wouldn't rattle all over the place while riding.  I used a spring that I found in the street connected to an aluminum tab and bolted the original striker to it.  For the handlebar mount, I modified a bicycle shifter lever mount I had to accept a 1/2" bolt which I tapped a hole in to accept the bell's 5/16"-18 eyelet piece.  To ensure adequate clearance between the bell and handlebars, I turned an aluminum spacer to go in between the bell and mount.  See details below:

Saturday, February 17, 2018

Kitchen Knife Handle

A while back I found this kitchen knife in the street that was missing a handle.  It seemed in good condition, so I decided to fashion a new handle.  I used this handle I was given from a broken brass hammer.

Monday, January 22, 2018

Bicycle Stem Repair 3

Previously on Scrap Attack:
We built this stem upgrade which cracked after 9 months of use
Building the stem upgrade
Then, repaired it with a second tube
Repairing stem upgrade the first time
And now:

Thursday, June 8, 2017

The Displeasures of Machining Fiberglass

For part of the <secret project> mentioned in the previous video on wood turning, I needed an insulating material for an electrical connection.  I had found this mystery piece of plastic on the side of the street and figured I'd try using it.  When I first picked it up I actually thought it was aluminum because of the weight and stiffness, but after scraping it on the ground, I started thinking it was chalk or something. I tried parting it off in the lathe, and it appeared to machine pretty decently and left a nice finish, clearly some type of resin or something.
Then I tried turning the outer diameter.... Aww SH*T! It's fiberglass!

Tuesday, May 23, 2017

Lathe Machining 16" Diameter Wood


More detail not covered in the video:

It all started when the law of Scrap Alchemy provided me with a bunch of free wood to experiment with.

Thursday, January 26, 2017

DIY Bike Pedals

Back in high school, my 2nd most ambitious project (the first being the foundry of course) was to make my own bike pedals from scratch.  I had used and broken some pathetic plastic pedals in my time, and decided enough was enough.  It was a great project because I got to learn how to use a lot of equipment usually unavailable to the rest of the class including a CNC lathe, mill, and waterjet cutter.  This was also when I learned how to do lathe threading, so I could cut those 9/16"-20 LH & RH threads for where the axles thread into the crank. 
custom made ice cream sandwich bike pedals
I had a visionary idea to start a business selling bike pedals that look like ice cream sandwiches.
One of the problems with the pedals was the fact that I had opted to use plastic bushings instead of ball bearings, and I had no concept at the time of what a tolerance was.  The bushing idea came from watching an episode of Edge Factor about a bike pedal company in Canada that used them. Furthermore, I had never used a CNC lathe before and I actually was the first one in the history of the school to learn how to use it (even before the instructors!).  What I ended up producing were axles that were several thousanths larger than the specified tolerance range provided with the bushings which caused them to wear prematurely.  I remember spending considerable time at the belt sander grinding them down just so they would fit.  If I had known how to use a micrometer, I could've inspected the axles while still in the lathe and readjusted the tool offset so I could hit the correct dimension.
custom pedals without diamond plate
Image from the failed pedal straps post
On top of that, I couldn't find the metal supply store that stocked 3/4" chromoly round stock, so I was forced to make the axles out of whatever was lying around.... bad move.
In the case of the pedals that went on my main bike, one of the pedals had an axle made of cold rolled 1018, and the other one was hot rolled.  Guess which one broke first?  Yes, the hot rolled one, since hot rolled is weaker due to its larger grain structure, making it softer and more flexible.  Notice the breaking pattern on the cross section, it's clear that the axle had been cracked part of the way through for a while before it finally broke off.  This happened after 5 or so months of use.  I had actually machined a new axle to replace the broken one, but over time, I just abandoned the whole project altogether.  I knew without the proper steel and heat treatment, this would eventually happen again.
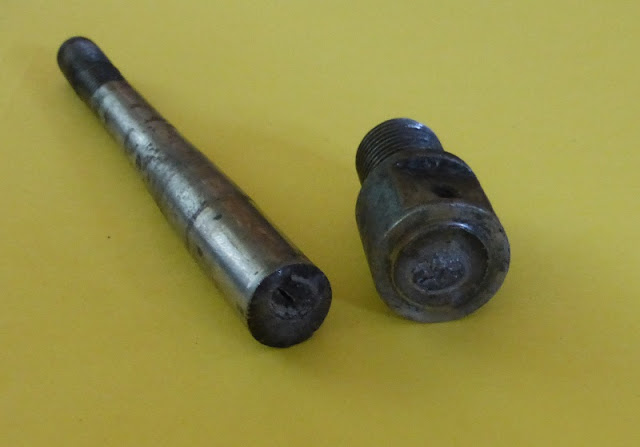
broken bike pedal axle
Fast forward a few years later: I bought some more pedals at a garage sale with hopes of rekindling my interest in toe straps.  These pedals looked really nice with the leather straps, metal clips, and everything, but for some unknown reason, the designers thought it would be a good idea to hold it all together with a PLASTIC pedal body!!!!  Now, you don't have to be The Mike Tyson of Engineering to know that plastic threads strip far easier than metal ones (take the waffle iron project for instance).  I didn't want to waste this perfectly good opportunity throwing out pedals with so many useful parts in tact, so I decided to take the initiative and give pedal building another chance... except this time I would already have a decent axle/ bearing set to work with, so I wouldn't suffer the same fate as before.
bike pedals with cheap plastic bodies

Thursday, September 15, 2016

Bicycle Trailer ep. 8 - Light Mount/ Finale

The finishing touch for the trailer was to add a rear light for nighttime usage. I found this light at a garage sale which had a 1/4"-20 thread mount, so I figured I could bolt it onto the trailer frame. I decided to tap a 1/4" thread into a 3/8" bolt for this. I figured I might as well use my most messed up bolt since the external threads weren't going to be used anyhow.
a light and a bolt

Thursday, August 18, 2016

Bicycle Trailer ep. 4 - The Linkage

After hours (okay maybe half an hour) of getting the alignment of where I wanted the trailer to follow behind the bike, it was time to enter "fabrication mode" and make the linkage. This is when the concept of tolerance goes out the window, and metal just starts flying everywhere, and you're not done until every tool in the toolbox has been used at least once and not for its intended purpose. Okay, maybe I'm exaggerating... but still, I remember this part taking a long time.
aligning the trailer behind bike
Doing some math to get the proper elevation and to make sure the two ends are parallel.
doing math to get trailer placement correct

Thursday, August 11, 2016

Bicycle Trailer ep. 3 - Trailer Hitch

I realized from the internet (and by observing homeless people) that there's really no right or wrong way to build a bicycle trailer hitch, so here's my story:
I was considering using a bicycle head tube and fork combined with the swivel castor I bought in the first post, but not having any spare bikes to take apart, I figured the steering mechanism from my scooter would work just as well. It was a great relief to finally destroy this thing after crashing on it at least once per day during my first week of college. Those small wheels just can't handle pavement deviations!
destroying a scooter
Video explaining the design:

Sunday, July 31, 2016

Bench Grider Tool Rest

Let's have a recap:
Since the demise of my terrible $3 Black & Decker bench grinder which didn't even have real bearings, there came a desperate need for a bench grinder that was actually good, the search began once again.

*I also had an oscillating sander by Black & Decker which also broke soon after I bought it at a garage sale. As a result, I've been living by the mantra: "Never Ever Black & Decker"

Monday, December 21, 2015

Pipe Clamp Vise

I received half of a pipe clamp at a garage sale for free since nobody else would buy it, and decided to make it into a vise.  I used a scrap block and a pipe nipple from the hardware store for $3.
pipe clamp half and some scraps
Just to make sure we're all on the same page, this is what a pipe clamp looks like.  One half (the half I got) mounts on the threaded end of a pipe, the other half can slide down the whole length of the pipe depending on the size of whatever you're clamping.  The second half is held on by some spring mechanism which I didn't feel like re-creating, so it turned into a vise instead.
a typical pipe clamp

Sunday, November 29, 2015

Bicycle Upgrayedd 2

With the success of the last bike upgrade, I decided I wanted to do it again! I figured I already got a good reliable bike for getting around, so why not get a rough-and-tumble bike that I can jump curbs with and not worry about breaking?
When I saw this bike at a rummage sale, I knew instantly it was the one.  Seeing that it's already the same color as my other bike, has good features, looks barely used and only $10? oh you know it!
Huffy Trail bike from rummage sale