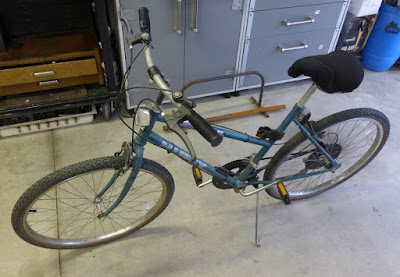
When I saw this bike at a rummage sale, I knew instantly it was the one. Seeing that it's already the same color as my other bike, has good features, looks barely used and only $10? oh you know it!
Let's run down some of the striking features:
This bike appears to be made, at least for the most part, in the USA by Huffy. Being that this was a budget bike at the time (probably in the 1990's) this must've been a challenge for Huffy trying to compete with all the cheaper foreign-made bikes on the market, I've noticed several simple, yet effective cost-saving measures that went into the manufacturing of this bike that would definitely save on labor costs. This is basically Huffy giving the middle finger to all the other bike companies that sold out to foreign labor. Some of the cost cutting measures appear to have made the bike heavier and maybe even stronger in some places. Definitely the right bike for me!
First of all: steel hubs and rims, no QR skewer. Hubs made by WALD. Interestingly, the front axle thread is an inch size, and the rear is a metric. Funny stuff.
ONE-PIECE-CRANK (O.P.C.), MIG welded frame, and integral kickstand:
I seem to have a thing for one-piece-cranks, it just seems like, if you can make it in one part, why do it in 3? One piece cranks are cheaper to make because it's just one forging, and I believe the bottom bracket shell doesn't need to be threaded. This particular bottom bracket shell isn't even welded at the seam! The pedal axles are also a smaller thread than on 3 piece cranks (1/2"-20 vs. 9/16"-20). This crank is also shorter than on my other bike, which changes the pedaling/ power ratio a bit, it feels like it accelerates better at the expense of less torque (lower moment about the bottom bracket due to shorter lever arm blah blah blah physics blah my education isn't worthless).
I don't see MIG welded frames too often, everything now seems TIG which is more time consuming and expensive, but as far as I'm concerned, if the tubing is thick enough, MIG welding is fine, and easier to do. My other bike does not have a kickstand (yet), so this is very good. The plastic pedals don't bother me too much, they say made in USA by Union.
 |
| Look Out For The OPC |
The ends of the fork, instead of having separate pieces brazed on, are just forged to the shape to accommodate the wheel axle. Definitely a time-saving maneuver. WHERE MY #10-32 TAPPED HOLES FOR RACK/FENDERS THOUGH!!!??? As it seems, the rear dropouts, as opposed to being forged or cast, were just punch-pressed from sheet metal making them thinner (and cheaper) than other bikes. The rear rack mounting holes were drilled with the tap drill size for #10-32, but they didn't bother tapping them. They probably figured if anybody was serious enough about putting a rack on this thing, they would do it them self, which I did.
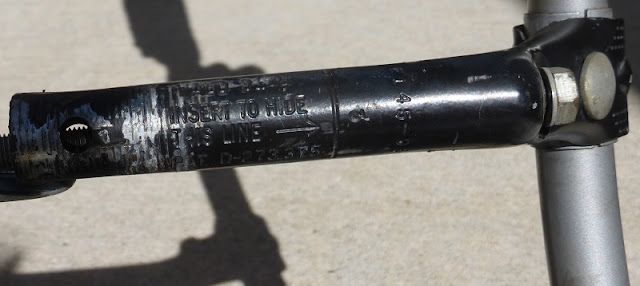
The Stem:
This one seemed most incredible of all. The entire stem is one piece stamped out of sheet metal! I've never seen anything like this on other bikes, they are mostly welded, cast, or forged, but this is impressive. Also notice the wedge thing, which are usually made of cast iron, is also stamped. Additionally, notice the handlebars require a shim where it meets the stem. The handlebars are simply a bent piece of 7/8" tubing. Most bike handlebars are bigger diameter in the middle to fit into the stem, but this way saves yet another extra manufacturing process. Also, notice the stem bolt is a carriage bolt! I love these guys! This means no worrying about stripping tapped holes, and no stupid metric Allen wrenches!!! The seatpost height and saddle angle adjustments are also carriage bolts.
I can only begin to imagine the complexity of the dies that were required to make this stem. Yes it's cheap, but it is some incredible work on behalf of the die makers. As can be seen by the writing, this stem does not offer much height adjustment, and clearly not enough to reach my level, which is what this "up"grade is all about.
Just so you don't get lost, here's what's about to happen. The new stem and seat post are being constructed with the original ones, a bunch of stuff is being welded on them to make it higher.
The only reason I call them "cactus parts" is because the design resembles a saguaro cactus.
 |
| Brought to you by Cactus Cooler |
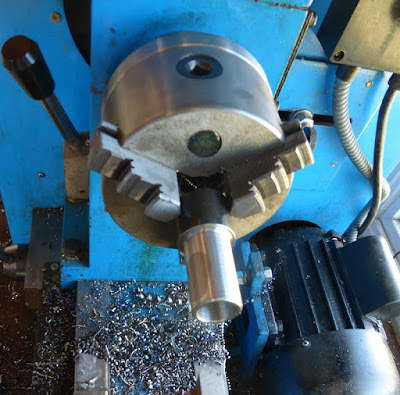
Turning down the new stem base.
Machining the cap. This inserts into the top of the new stem base and is where the stem tightening bolt secures up on.
Upon measuring the angle of the original stem where the wedge goes, it was found to be 20°.
Milling the 20° angle on the new stem base.
The "cactus parts" here are being notched with files. I chose to use this design because the scrap metal I found was already bent. Also, the previous handlebar upgrade I did only used one vertical member, and I figured with tubing of this diameter, it wouldn't be as rigid. Plus, the design fits with the original stem.
Now machining seat post adapter 1 which connects the original seat post to the extension tube.
Machining seatpost adapter 2 which connects the extension tube to the saddle.
All the seatpost parts prior to welding.
Welding the new stem and seatpost. As before, tack welding the stem was the hardest part because lack of extra hands.
After re-assembling the bike, I needed to add extra cable housing for the brakes and shifters to reach that high. At the points where the added housing meets the original housing, I didn't have anything connecting them, and the shifter wouldn't work correctly since the connection wasn't rigid enough.
To fix this, I machined some cable housing couplings from some trash-picked aluminum.
Now the shifters and brakes work very good.
Upgrade complete. I added a rack and basket to the back which were garage sale items for less than $2. I still prefer front baskets though. That way I would notice if something fell out.
I really like how the stem turned out, especially since the fitting took forever, and the parts almost didn't fit together!! I painted it with some gray Hammerite from a garage sale, one of my favorite textures. (The fact that it's from a garage sale isn't the part I like, I rarely have luck with garage sale spray paint!!)
I painted the seat post with clear paint to show the sanding marks, and because the pink from the last seatpost ran out.
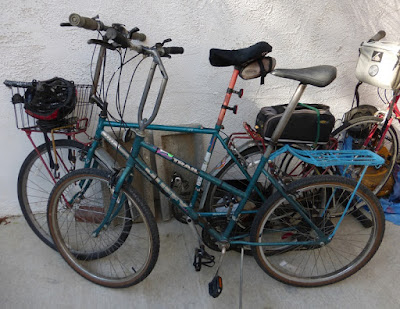
Comparison with my other bike:
Before
After
Score 2 for tall people.


No comments:
Post a Comment
Hi folks, please only leave comments relative to the blog post. All spam will be removed and spammers will be blocked.
Note: Only a member of this blog may post a comment.