
This week I am actually back home at my parents' house. So I decided to be useful and build them a hydroponic setup for lettuce and other greens. I decided that a deep water culture setup, similar to the one I have on my balcony would work best. The main differences between mine and theirs are:
1) They have aeration
2) Different sized plastic
3) Using smaller net pots.
Additionally, since I did not bring my fertilizer, I will be using some of theirs, some 18-18-21 tomato fertilizer. Here are the necessary and optional materials:
 |
| Overview of required items |
(2) 30 gallon plastic totes -- $12 (recommend using 10 gallon totes)
(26) 2 inch net pots -- ~$10
60 gallon air pump -- $15
Airline tubing 25 feet -- $6
(4) Air stones -- $3
(4) T valves -- 4 x $1.30
72 cell seed starting tray --$4 (optional)
Seed starting mix -- $5 (optional)
Lettuce and Cabbage Starts -- $7 (optional)
Lettuce Seeds -- $1-$2
Epsom Salt -- ~$3
Tomato fertilizer -- $7
Pea Gravel -- $3 (only a small amount of gravel is needed)
Approximate cost: $53-$75
Tools needed
Box cutter
Drill
Hole saws (optional, but extremely useful)
Some of these items can be found at cheaper prices (such as seeds) while others last for multiple plantings (fertilizer, gravel)
With a system this size, lettuce is the number 1 crop to grow in it. I think you could also get away with Chinese cabbage, bok choy, spinach, basil, and other similar greens in it.
In hindsight, I would recommend investing in a smaller, more stable 10 gallon bins instead of 30 gallon bins. The 30 gallon bins bend way too much and had to be cut down significantly to work properly. I cut them down to about 1/3 of their size. This was done with a box cutter and some muscle. The 10 gallon bins might cost slightly more than the 30 gallon bins, but extra reinforcement is necessary.
Next, I took both lids and cut 18 2" holes into each one. Unlike my previous project, I used a hole saw from a kit I bought not too long ago. After trying them out today, I'll say that that investment was one of my better ones. It's much easier to make the holes using the saws than with a simple razor blade. This saved about 2 hours from the previous project.
The next step was to add the air line and pump. I forgot to buy one of the T valves I wanted, so I'll need to add that in before I return to my apartment. Each reservoir has 2 air stones powered by a 5 gallon 60 gallon pump. I wanted to try the pump here because 1) This house has an outlet outside 2) Parents might fear insects breeding in still water 3) Wanted to see if air pump leads to faster growth.
edit: I upgraded the pump as the 5 gallon pump wasn't producing enough air. The 60 gallon pump produces a lot more air and less noise. For $8 more than the 5 gallon pump, the investment is well worth it.
One this was tested, I added about 3 tablespoons of tomato fertilizer and 1.5 tablespoons of Epsom salt to each bin. From a reliable source, Youtube user mhpgardener, I was told that the tomato fertilizer works fine for this kind of setup. Not as good as what he uses, but do remember that this setup is running an air pump.
Next the gravel was washed and the plant starts were transplanted into the net pots. Some of the lettuce had multiple plants per cell, so those were split apart to fill the entire system.
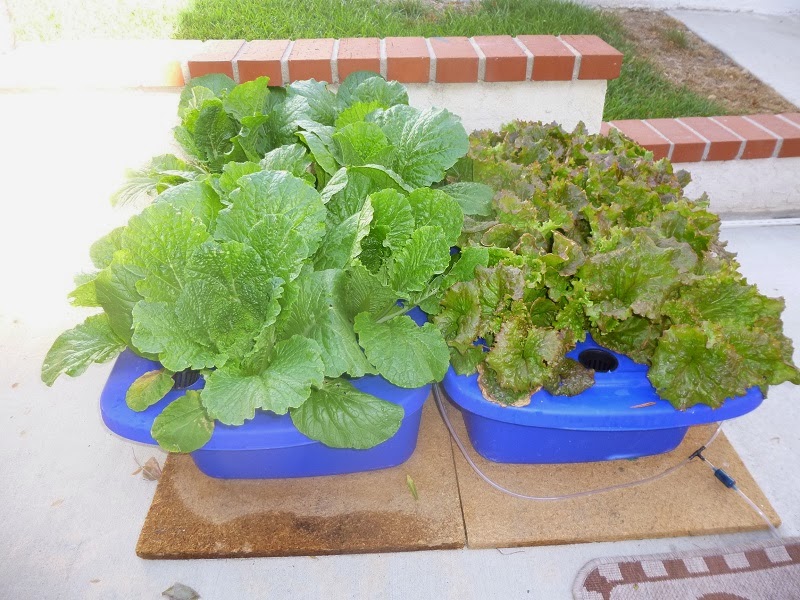
That concludes the assembly of the system. The seed starting mix + the seeds will be used to replenish the supply of lettuce in the system as the others finish up. If staggered correctly, about 6 heads of lettuce can be harvested weekly. I'll try to get photos from home to update this system as it grows. Feel free to ask any questions or comment below.
With a system this size, lettuce is the number 1 crop to grow in it. I think you could also get away with Chinese cabbage, bok choy, spinach, basil, and other similar greens in it.
In hindsight, I would recommend investing in a smaller, more stable 10 gallon bins instead of 30 gallon bins. The 30 gallon bins bend way too much and had to be cut down significantly to work properly. I cut them down to about 1/3 of their size. This was done with a box cutter and some muscle. The 10 gallon bins might cost slightly more than the 30 gallon bins, but extra reinforcement is necessary.
 |
| Cutting only 1/3 off wasn't enough |
 |
| A better size |
 |
| Marking the lid |
 |
| Bringing out the drill |
 |
| Testing out the hole - a perfect fit |
 |
| One lid cut (not dusted) |
 |
| Lid with net pots added |
edit: I upgraded the pump as the 5 gallon pump wasn't producing enough air. The 60 gallon pump produces a lot more air and less noise. For $8 more than the 5 gallon pump, the investment is well worth it.
 |
| Bubbling away |
Next the gravel was washed and the plant starts were transplanted into the net pots. Some of the lettuce had multiple plants per cell, so those were split apart to fill the entire system.
 |
| First few Napa Cabbage |
 |
| Into the system it goes |
 |
| Future lettuce |
 |
| Here we go! |
If you're interested in what we do and want to see more, sign up for our mailing list.
You'll receive our free eBook.
Growth Progress and Maintenance
You'll receive our free eBook.
Growth Progress and Maintenance
 |
| Growth Updates (Sept 2013-Dec 2013) |
 |
| Maintenance (Dec 2013) |
 |
| GROWTH UPDATES (Jan 2014 - Mar 2014) |
SO AWESOME!!!!!!
ReplyDeleteThanks for the inspiration. Great project for me to work on during COVID shut in.
ReplyDelete