One of my spring break projects was the construction a hydroponic system to utilize more growing space available in my apartment. The lower balcony is getting significantly more sun than in winter so I figure it is time to start using it again.
 |
| Completed system with new plants |
For starters, I originally planned to make a float system out of a nice desk table I found on the side of the road. I gave up on that idea because 1) It seemed more difficult than it needed to be. 2) Gathering the wood and other materials required multiple trips 3) It was a nice desk, and the apartment needed more work space (I'm using the desk right now as my table).
I ended up buying some 18 gallon storage bins as a replacement for my table. 3 of these bins represent the same surface/growing area that the table provided (4'x2'; 8 square feet). I also bought some 3.75" net cups to hold my plants in the system. My list of supplies is (including tax/shipping):
(3) 18 gallon storage bins -- $6.33 each -- $19
(20) 3.75" net pots -- $0.73 each -- $14.55
Soil-less seed starting mix -- $6
Big box fertilizer -- ~$5
Box of Epsom Salt -- $2.50
Pea Gravel -- $2.20
Seeds -- $2/packet
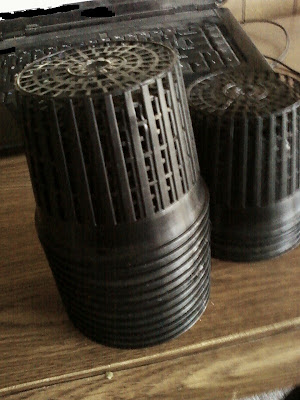 |
| Net cups, available at any hydroponics store |
I already had Epsom salt and the fertilizer, so my total expenditure on things I didn't have was about $40.
You might have noticed that I am not using a pump of any sort. Even though it would help with growth, the plants I would be growing in it don't necessarily need a pump to grow. I based my system off a hydroponics float system that works in similar fashion. To assemble this system, I traced the net cups in the locations I wanted them on the lid. Using my utility knife, I scored a circle within the outline of each pot and cut each hole out(the net pots have a small lip that allow them to hang onto the edge). I used a knife, but if I were to
make a bigger system, I would invest in a
holesaw set. After inserting each net pot, the system is almost ready to go! All that is left are the nutrient solution and the plants.
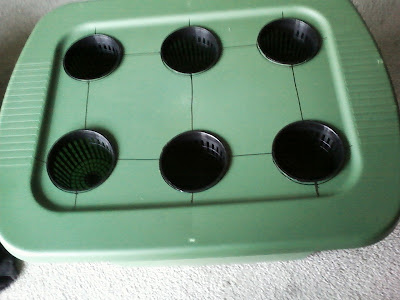 |
| Ready for plants! |
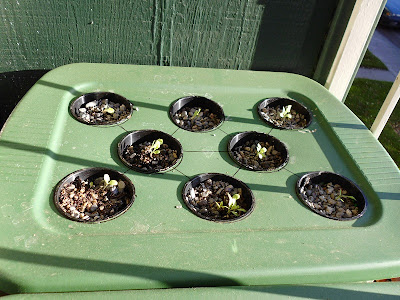
Each bin has 6 plant spaces, except for one, which will has 8. Because of how I spaced the net cups in each bin, and because each bin is very deep, it allows me to grow a variety of different vegetables. These systems are mostly used to grow small crops like leaf lettuce. But I can also use it to plant Romaine lettuce, Bok Choy, Swiss Chard, tomatoes, and even cucumbers. In my first planting of the system, I will be experimenting with each of these. The 8 plant bin will have 3 different varieties of lettuce, one of the 6 plant bins will have Lemon Cucumber and Spacemaster Cucumber, while the final bin will contain other plants that are ready to be planted. I paired plants with similar root sizes in the same bins so one variety doesn't starve the smaller plant essential water and nutrients (This wouldn't be a problem if I kept bin contents homogeneous, but alas, I like to experiment).
 |
| All 3 bins (empty) |
Now you might be wondering if this system is worth the money. If I were to fill this with lettuce exclusively, I can definitely recoup my initial investment in less than 3 months. with 20 plants total, and the market price of lettuce being between $2-$3, That's approximately $40-$60 worth of lettuce, (I'll use the average price of $2.50/plant), meaning I make a profit of $10 the first growing cycle. Not too bad, except I am not factoring in time. Regardless, after the first season, it will have paid for itself. With other plants, more prolific plants, like tomatoes, peppers, and cucumbers, those should provide more value over time. Cucumbers go for about $1 each, and each plant has an average yield of about 7 fruit, meaning that a bin could potentially provide $42 worth of food in a growing session. These might be unrealistic expectations, knowing how my balcony is however.
Now to fill these things, I first measured out the amounts of nutrients I needed, then added enough water to fill up the reservoirs. Luckily, the plastic is strong enough to withstand the weight of the water, allowing for the lids to snap on fine with no bending issues. I have selected a nutrient system of 54 grams of 15-30-15 water soluble fertilizer with micro-nutrients and 27 grams Epsom salt for each bin.
 |
| 2 bins thus far |
I have gone ahead and planted the bins. The 8 holed bin is a mixture of Iceberg, Romaine, and Leaf lettuce. The middle bin is a mix of Spacemaster Cucumber and Lemon Cucumber. The final bin, which I plan to plant tomorrow, will most likely be Swiss Chard and a different plant as the Bok Choy I originally planned for that one did not germinate. I might put some larger tomato plants in there to see what happens.
 |
| Cucumbers. Spacemaster is on the left |
 |
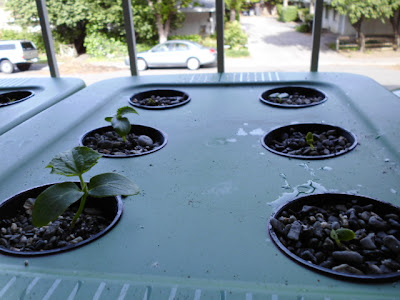
| Lettuce, might have transplanted too early. |
I will be posting updates on this system periodically.


No comments:
Post a Comment
Hi folks, please only leave comments relative to the blog post. All spam will be removed and spammers will be blocked.
Note: Only a member of this blog may post a comment.