As part of our brewery renovation campaign after our
last batch got infected, we decided to do away with the brew-in-a-bag method for all grain brewing and build an actual lauter tun. We watched a video showing different methods and devices used for a lauter tun. Some options included buying 5-10 gallon water coolers. We opted to use three 5 gallon buckets to build ours (known as a zapap lauter tun) since we are cheap.
 |
| 1/8" inch drill bit used for the holes |
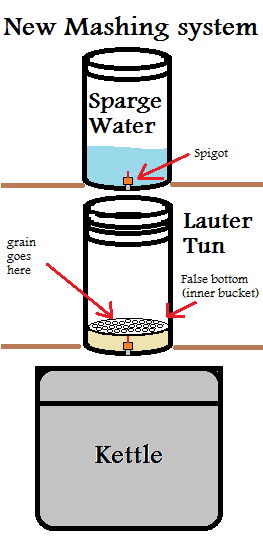
This setup requires 3 buckets total in addition to the brew kettle (only 2 buckets are required if batch sparging). Two of the buckets would be fitted with a spigot, One for holding hot sparge water at the top, and the other to for holding the false bottom/collecting wort. The third bucket is turned into a false bottom by drilling a bunch of 1/8" holes in the bottom of it.
 |
| A lot more tedious than you'd expect |
Once the spigots I ordered arrived, I attached them to 2 different buckets. This was accomplished using a corresponding holesaw to fit the spigot gasket. Aside from now being lautering buckets, they are useful for
bottling homebrew. The image shows how the new setup will work.
The mash will be done in the kettle on our stove prior to transferring grains to the lauter tun (read as "carefully dumping the grain over the false bottom"). The kettle is cleaned before it is refilled with wort (minus the grains). Once lautering is complete, the grains can be easily removed by lifting out the false bottom and transferring the grains to a trash bag, compost pile, or storage for spent grain baked goods.
 |
| Actual setup (ignore the messy kitchen) |
The sparge arm in this setup was built from CPVC fittings and a nylon barb attached to tubing. Although a sparge arm isn't necessary, it is nice to have one for continuous sparge operation (fly sparging) so you don't have to monkey around waving hot tubing over the grain bed. Below is a video of this setup in action.
Additionally, since we lost one of our buckets to infection, we needed some new fermenters. We converted two new lids we bought into airlock-lids by drilling a hole into each and threading a nylon barb into it.
 |
| Simple barb attachment |
Tubing can be attached to the barb which will feed into airlock fluid. I like this slightly better than the funnel method because it's easier to clean and can fit into
smaller places with its lower height profile.


I have been brewing for 2 plus years, and am yet to stop using my Zapap tun. At first I used the "standard" method, 1 bucket inside of the other bucket with many holes drilled through, and I cut a piece of fine mesh aluminum to use as a false bottom filter. There was always a gallon or so under the bucket, and caused the grain bed to be uncovered. I would always have to pour a gallon of sparge water, so the grain was covered.
ReplyDeleteThe point of this post is to say, by cutting the drilled bucket bottom off, it can now be "wedged" in to make a false bottom that does not hold a gallon or so in it. The spigot side has the "new" bottom setting on top of it, and the other side is almost touching the bottom. The grain bed now stays covered, and warm.