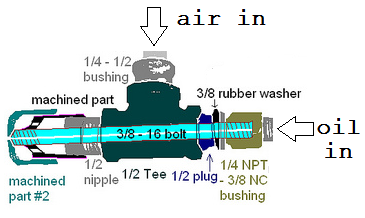
My old burner was a tangled mess of pipe fittings and badly fitting machined parts. The excess complication led to unreliability, for example, the oil inlet was held on with a 3/8" non pipe thread which meant it did not seal and was suspect to coming undone. Also the airtightedness was maintained by a rubber washer secured by that same 3/8" thread. The tightness of the 3/8"-1/4" pipe bushing (golden part in below diagram) at any moment could compromise both the air and oil pressure allowing leaking and also cause the whole oil input pipe to rotate loosely being annoying. Clearly this design was an absolute disaster, good thing the burner got lost/ stolen/ borrowed.
 |
| 10 parts total |
Having learned more about precision and gained confidence in my home welding abilities, I designed a new burner to be entirely machined and welded. The whole process was planned out so there would only be two pieces to this burner. The main piece (the black one) is composed of 3 separate pieces of metal, but after being welded together, it counts as one.
 |
| 2 parts total |
Firstly starting the main piece with a 1/2" hole all the way through a short piece of 1.25" steel.
Then using some arbitrarily sized larger drill to drill most of the way through. The only size concern for this drill: bigger than 1/2", smaller than a 1"-20 thread relief groove (<about .87").
For the air inlet, first drilling and tapping 1/4" pipe threads in a piece of 3/4" stock. My
home made tap handle's extension handles were very necessary for this since pipe threads require much more torque to tap than regular threads due to all the teeth cutting instead of just the end ones. This is because pipe threads are tapered and as the tap goes deeper, every thread gets successively wider.
For the oil piece, first turning a 1/2" section on a 5/8" round rod. I then turned it around and drilled most of the holes and tapped the pipe threads in the other side (picture missing).
This way the main piece fits over it with a good degree of concentricity.
Then, for the oil piece, drilling and milling a hole and flat on the side.
Then drilling and milling a corresponding hole and flat on the main piece where they will join.
Here is how the three pieces will fit together
All set up in a vise ready to weld.
During welding, I used some aluminum foil to protect the pipe threads from getting messed up with weld spatter. I noticed that the metal turned purple from the heat, that means it's good steel right? The reason for my improved welding confidence was because I switched from using 3/32" rod to 5/64" which made a world of difference on my 100 amp AC welder. Before with the bigger rod, it was 80% trying to strike an arc, 20% trying to weld. Now with the smaller rod, it welds like a real welder.
Now the whole thing fits in the lathe ready for all the important machining in one setup.
First turning the 1" major diameter for the threads.
Then turning the 15° external taper and drilling the hole. I drilled 3/32" even though I forgot that the last burner performed best with a 1/16" orifice. We will see how this plays out later. I also machined off the beautiful weld and the end of the oil piece just for the heck of it.
Then I turned the 1"-20 threads. I used this size because it is the only 1" tap size I have, allowing me to make a gauge to check the threads.
For the cap piece, I first drilled, bored and cut an internal thread relief groove in another piece of 1.25" stock.
Then I cut the threads with an internal threading tool. Since my I.D. threading tool is oriented so that the spindle is running backwards, the tool cuts from the inside out. This means there is no danger of accidentally crashing the tool into the bottom of the bore. I used this same technique on the
5-C collet cloture.
Then cutting the 15° internal taper with a small boring bar. It was important that the tapers and threads were cut in the same setup since the threads and taper need to be concentric to each other.
Afterwards, adding a knurl on the cap so it is easier to unscrew. Not the prettiest knurl, but aesthetics aren't that important for a piece that is going to be essentially engulfed in fire and out of sight during use.
All done, and much simpler than before. We shall see how this performs in the upcoming foundry season.
The old one:
CONTINUE TO PART 7 -- Trying out the new burner
BACK TO PART 5 -- Soap Dish Casting Attempt #2
BACK TO THE FOUNDRY MAIN PAGE


No comments:
Post a Comment
Hi folks, please only leave comments relative to the blog post. All spam will be removed and spammers will be blocked.
Note: Only a member of this blog may post a comment.