

One of the easiest ways to transition into all grain brewing is to use the Brew in a Bag method. When I moved and lost my larger brewing equipment, I had run into the problem where my new small brew kettles could not hold all the grain required for a standard 5 gallon batch.

So I have devised a system where I can mash my grains in a 5 gallon bucket instead of using a kettle on a stove top. Essentially, if I can make a lauter tun out of plastic buckets, then I can mash in one too. Here are the items required:
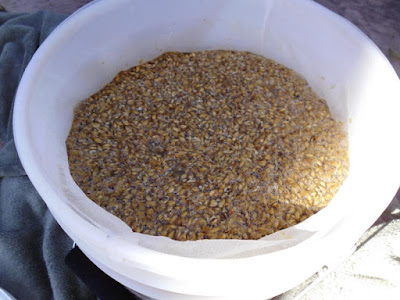
Brew in a Bag in a Bucket

5 Gallon Food Grade Plastic Bucket
Paint Strainer Bag
Large Blanket
Start by heating up the mash water slightly above the target mash temperature (usually 65°C) in the brew kettle on the stove. While that is heating, setup the bucket on the blanket outside. Line the bucket with the paint strainer bag. Pour in most of the water and wait a few minutes for the temperature to equilibrate. Place the remaining water back on the stove, and resume heating it above the target temperature (target 80°C).

Slowly mash in the grain, one cup at a time, stirring it in to avoid grain balls. Once complete, check the temperature; it should have dropped below the target mash temperature. Incrementally add in some of the hotter water from the stove to increase the temperature of the mash in the bucket back to the target.
Place the lid on the bucket and wrap the blanket around the bucket. Wait for the desired mash time (60 - 90 minutes).
When mashing is complete, slowly remove the grain bag from the bucket, allowing the wort to drip back down. At this time, the bag may be placed into a second bucket and sparged. The wort can now be carried forward into the boiling kettle.

Pretty simple and easy to utilize technique. This is a very easy way of starting with all grain brewing that can be done at a signicantly less cost than building a lauter tun. Here are some advantages and disadvantages of mashing in a 5 gallon bucket.
ADVANTAGES:
Easy to clean mess; stray grain stays out of the brew kettle
Cheap to setup
Temperature drop is minimal as plastic is a better insulator than stainless steel or aluminum
DISADVANTAGES:
No direct temperature control
If the water is too hot, the plastic will warp
A second container is required if sparging is needed
Here are some of the brews I have made using this technique:
Rye Stout
Burton Bomber
SN Celebration Clone
Graff #1
I hope you enjoyed this guide. Use the link below to see more homebrewing recipes and guides.
No comments:
Post a Comment
Hi folks, please only leave comments relative to the blog post. All spam will be removed and spammers will be blocked.
Note: Only a member of this blog may post a comment.