After Halloween, I was looking in the dumpster for free pumpkins to cook. Unfortunately, there were no pumpkins, but instead a free air compressor. I figured this was a better find. I tried plugging it in, and the motor started sparking like crazy and spinning. This was nothing I wanted to try repairing, so I decided to rig it up to a
bicycle instead.
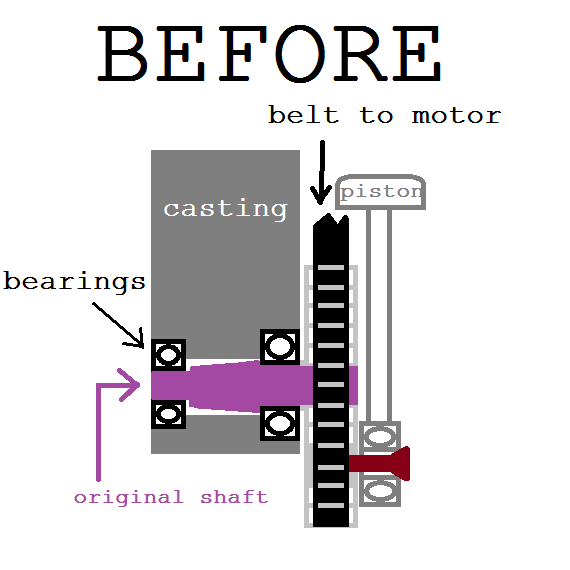
First of all, taking off the plastic housing to reveal all of the inner workings. It wasn't as complicated as I expected, basically a motor spins a flywheel connected to a piston to compress the air, like a backwards combustion engine. My modification was to take out the motor and attach a
bike sprocket to drive the flywheel.
Due to the original design, this meant I would have to make a new shaft since the original one didn't have any space to mount a sprocket. To add to the problem, I couldn't get the shaft out because the bearings were press fit and glued into the compressor's casting. My only recourse was to do the impossible and
drill out the entire shaft. I was very lucky that the shaft was not hardened because otherwise the drills wouldn't cut.

Taking the motor out.
Starting to drill out the shaft. I had to wedge a piece of metal in the flywheel to stop it from spinning while drilling.
After a lot of drilling, and using nearly every tool in the toolbox, I finally got the shaft and the bearings removed.
Starting the new shaft in the lathe. I don't remember the dimensions since they were metric, and therefore, not important.
Turning the other end of the shaft.
Milling set screw flats on the shaft. The original shaft didn't have flats for set screws because all the components were press fit with tighter tolerances.
Now turning the hub for the sprocket.
Drilling the set screw hole after welding the sprocket on.
To start the set screw hole in the flywheel hub, I used a long center drill. Of course I could've just cut off the belt teeth since they weren't needed anymore, but then it would look ugly and imbalanced.
Tapping the set screw hole. Good thing the tap was long enough for this.
All the new shaft components are in place.
The only information I could find on
bicycle-compressor conversions was from an Instructable where they made this:
I decided that I didn't want to destroy a perfectly good
bike for this project, and also since this compressor is so small, I figured I could just mount
my bike directly on it in place of the rear wheel. Also look at that gear ratio! that looks like it'd take a fortnight to get any decent amount of air.
 |
| Perfect fit! |
I designed this mess for the drive train:
Here's the same thing, except less coherent and hand drawn.
First the piece for the big sprocket was made of some welded pieces.
I took the big sprocket off some terrible old riveted crank.
Now turning an undercut on the piece of plate to mount the sprocket. This was a pain because the interrupted cut caused enough torque to stall the spindle if the depth of cut was too deep. Also boring the inside to accommodate the aluminum sleeve/bushing.
Afterwards, drilling holes to bolt the sprocket.
Then drilling and tapping a setscrew hole to secure to the aluminum sleeve.
Finally, welding on another small sprocket. This is the one that connects to the
bike's chain. The big sprocket connects to the small sprocket on the compressor. This way I've reduced the gear ratio twice, so it will spin fast. During welding, I plugged the hole with a scrap piece of aluminum so no spatter would mess up the bore.
Here I am milling a flat on the aluminum sleeve.
Now making the bushing shaft bits that the aluminum sleeve will spin about. These thread onto the ½" threaded rod that goes in place of the rear wheel axle.
The rod needed relief grooves in order to fit into the
bike's dropouts.
For mounting all of this, I used the conveniently placed threaded holes that the original plastic housing screwed into. I used some angle iron from a bed frame.
Then I welded the support rails on top. Just to be safe, I covered all the compressor stuff with some sheet metal so I didn't accidentally ruin anything with weld spatter.
For the slot the threaded rod mounts in, I started by drilling a lot of holes.
Then bigger holes.
Then milling it out to ½". Drilling the holes first made milling it a lot easier.
Everything ended up fitting together perfectly. The first time I tried spinning it without putting oil on the bushings which caused the aluminum to gall and stall, not good. After some lubrication, it would spin more freely.
It looks pretty funny to have the rear wheel replaced by a compressor, but that was the plan, essentially an exercise
bike that stores your energy as potential energy of the pressure difference between inside and outside the tank.
Now the test. I believe the chain keeps falling off because it is my old
bike chain which was stretched by some ¼" per foot, and thus doesn't mesh with the sprockets correctly and therefore, loose.


Thanks
ReplyDeleteGreat article on Air Compressors, very informative, thank you
ReplyDeleteWell this is definitely a neat way of taking the seemingly pointless activity of riding an indoor bike and putting it to good use!
ReplyDeletenice post
ReplyDeletenice post.
ReplyDeleteI had a plan like this but could not manage it. It can be the alternative of generator powered air compressor where electricity is not available. I have gone through all your images given step by step and really understandable. I have a plan to try at home. I do some engineering works like this at home. This post will help a lot if I try to do it at any time.
ReplyDeleteThis is a good idea to infuse exercise while yielding something useful. The procedure seems complicated but I'll have my team work on it. I or my wife can be on that bike. Thanks for sharing this.
ReplyDeletePlease provide full information in PDF format
ReplyDeleteWow great article
ReplyDeleteBest for those who want to save money or having no electricity in there area. Never the less any one can built this.